Integrate DecoNetwork with QuickBooks Desktop (QBD) to easily sync your customer, invoice, product, and transaction data. Once the integration is configured, customer records, orders, sales transactions, and purchase orders from DecoNetwork will be imported automatically into QBD, eliminating the need for manual data entry and reducing the cost of likely errors in manual processes.
Prerequisites
- You must have administrator access to use this feature.
- You must be using QBD 2015 or later.
- An understanding of your business' accounting procedures is strongly advised.
This guide will take you through the integration configuration process. Before commencing it is advised that you become familiar with QBD's audit and restore backup features. This will help you roll back any errors introduced into QBD by a misconfiguration, especially important when connecting to your live company data. We also recommend that you read the Accounting Integration Overview so that you understand how the accounting integration feature works, what benefits it provides, and what is supported by this setup.
In this article...
- Setting up the DecoNetwork to QBD Connection
- Configure QuickBooks Desktop to work with DecoNetwork
- Configure Integration Options in DecoNetwork
- Complete and Test the Configuration
- Take the Integration Out of Test Mode
- Syncing your data
- Accounting Sync Queue
- Sync History
Setting up the DecoNetwork to QBD Connection
Ensure QBD is running on your computer before commencing.
- Log into your DecoNetwork Website.
- Browse to Admin > Reports.
- Select Accounting Software Integration.
- Click on the QuickBooks Desktop button.
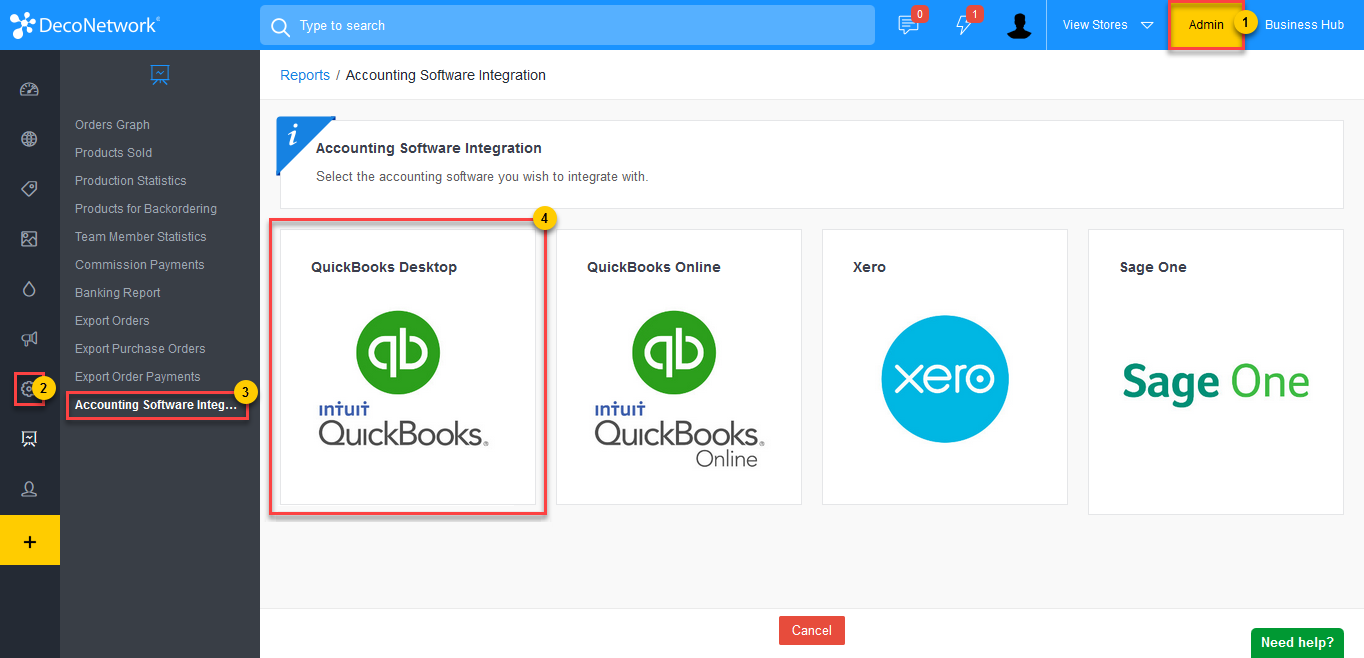
- Click Integrate with QuickBooks Desktop.
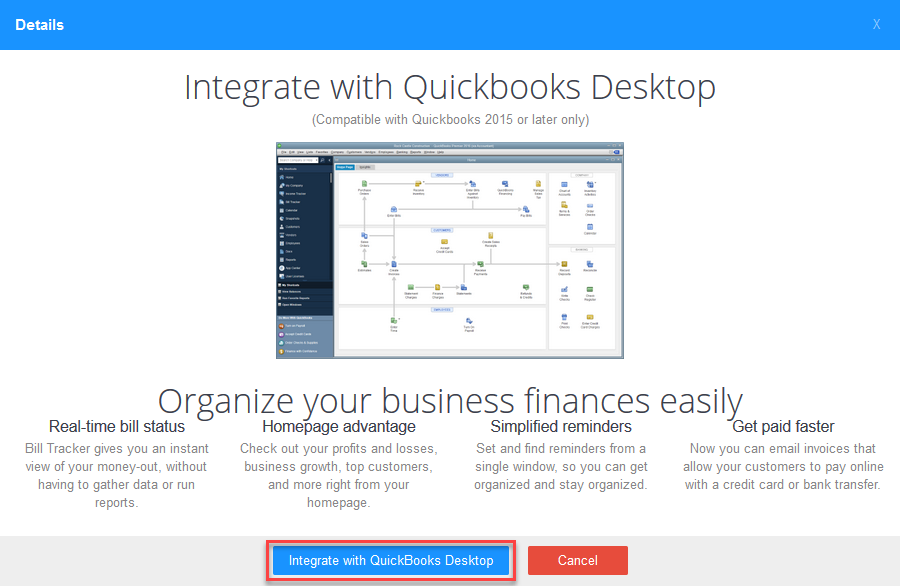
- Follow the instructions on the Connect to QuickBooks Desktop page to set up the connection:
- Click on the link to go to the QuickBooks Web Connector App download page.

- Download and install the QuickBooks Web Connector App.
- Click on the link to download the DecoNetwork QuickBooks Web Connector file.

- Load the QuickBooks Web Connector App.
- Click on the Add an Application button.
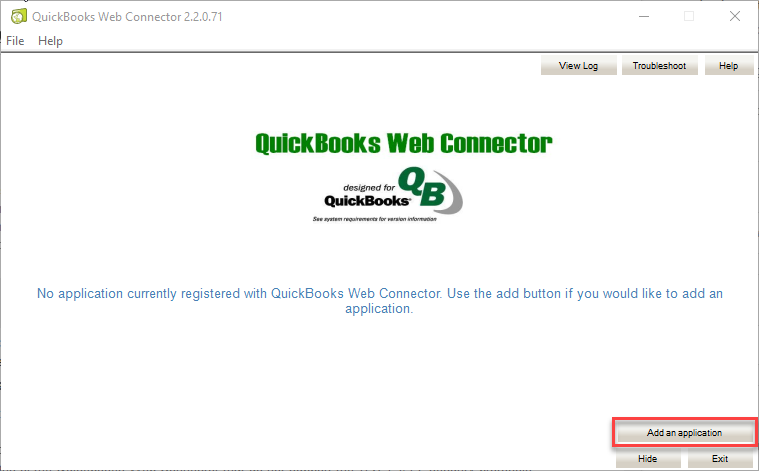
- Select the DecoNetwork QuickBooks WebConnector file you downloaded and click Open.
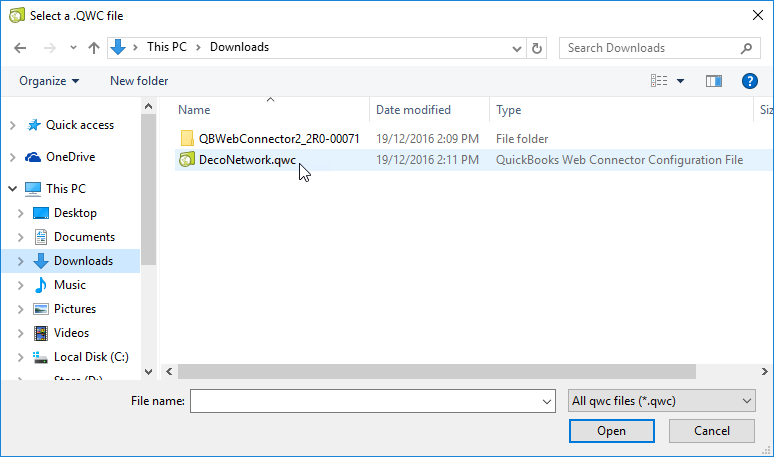
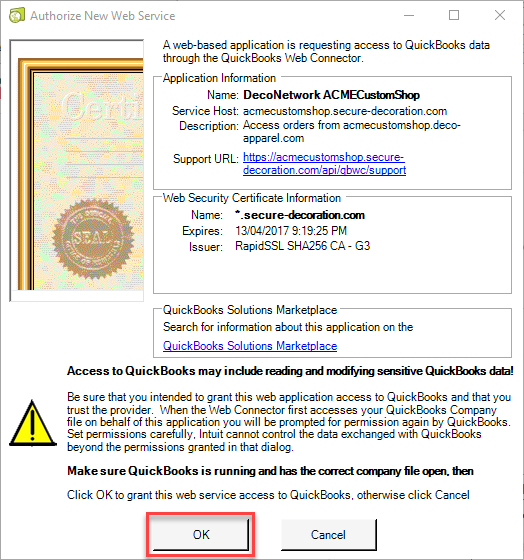
- Click OK to authorize the DecoNetwork Application.
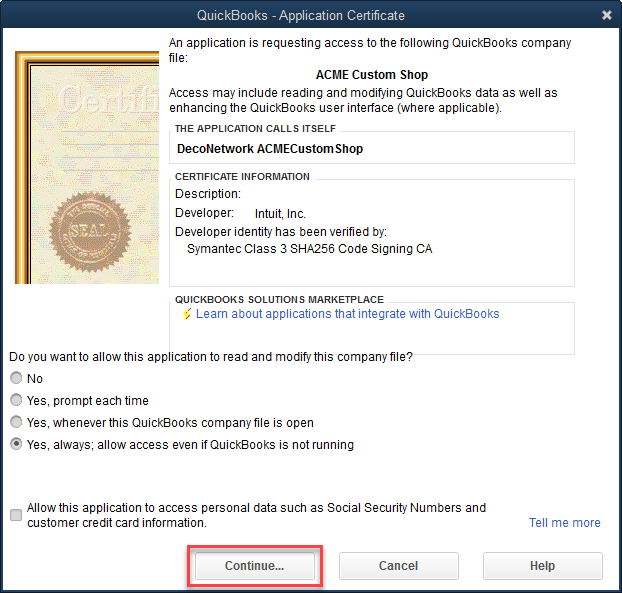
- Select the "Yes, always; allow access even if QuickBooks is not running" option and click Continue...
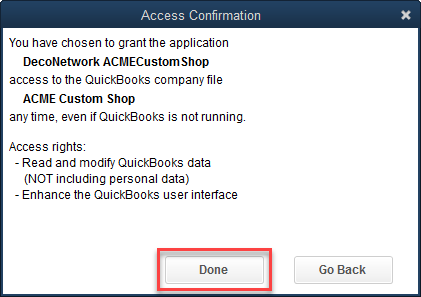
- Click on Done to confirm access.
- Sync your data for the first time:
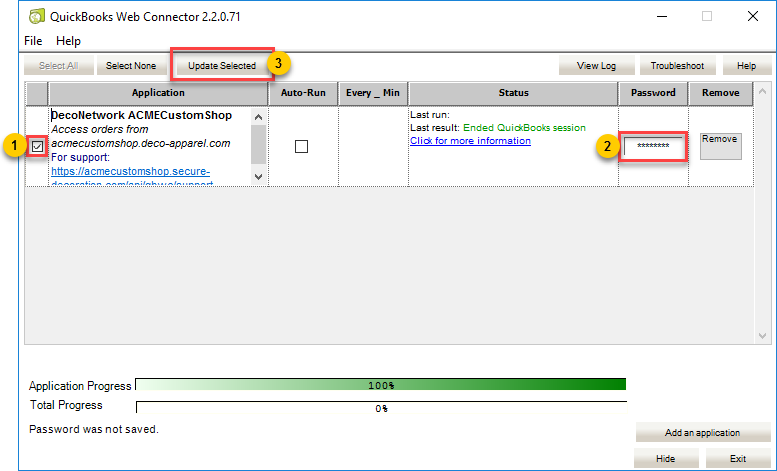
Select your website, enter your DecoNetwork password, and click Update Selected.
- QBD and DecoNetwork will now set up the connection
- The connection now has to be configured and tailored to suit your business
- Refresh Lists will populate many of the DecoNetwork configuration drop-down boxes with the latest data from QBD
- QBD may need certain configuration options modified to allow DecoNetwork configuration fields to populate correctly
- You can tick the Auto-Run checkbox to schedule data to be synced regularly after the initial sync. Set a value (in minutes) in the Every _ Min column for how often you would like the sync to run.
- Click on the link to go to the QuickBooks Web Connector App download page.
Configure QuickBooks Desktop to work with DecoNetwork
Before connecting DecoNetwork to QBD, you need to configure QBD with the appropriate mappings to allow for seamless integration. The following settings in QBD are recommended to ensure that DecoNetwork is able to synchronize your data. It is likely that your business will already have at least some of these settings configured if you are already using QBD. As always, give careful consideration to any configuration items that you may need to change and seek advice from your QBD professional if you are unsure.
Create a DecoNetwork Customer
When you configure the DecoNetwork and QBD integration you will have 3 options for syncing customers:
- Create individual customer records in QuickBooks for each order by an account holder and import all other orders from DecoNetwork into a single customer record
- Create individual customer records in QuickBooks for all orders
- Import all orders from DecoNetwork into a single customer record
If you wish to use options 1 or 3, you need to create a generic DecoNetwork customer in QBD, which will be the same customer used to map all customers who place an order in DecoNetwork.
To Create a Customer
- From the main menu, select Customers > Customer Center.
- From the Customer Center menu, select New Customer & Job > New Customer.
- In the New Customer dialog, enter a Customer Name such as "DecoNetwork Customer".
- Click OK.
Make a DecoNetwork Class
In QBD, you can create classes that you assign to transactions. This lets you track account balances by business segments.
This is optional, but if configured, classes will tag transactions as coming from DecoNetwork which may better suit your reporting purposes.
To Create a Class
- From the main menu, select Lists > Class List.
- From the Class List dialog, select Class > New.
- In the New Class dialog, enter a Class Name such as "DecoNetwork".
- Click OK.
Set up Order Line item mappings
Each order line item in DecoNetwork needs to be mapped to an item in QBD. You need to create mappings for products that you sell and also for all services, extra charges, and credit items that you offer in DecoNetwork.
With products, you can choose to record them using a single generic item in QBD, such as sales. If you choose to use a single item, you need to manually create an inventory or non-inventory item in QBD. This item will be the same item used to map all products sold in DecoNetwork.
If you choose not to use the same item to record your product sales, the system will automatically sync each individual product from DecoNetwork into QBD.
With services, extra charges, and credit items, mappings need to be specified individually. However, you can choose to combine these into a few items or a single item if you wish. You can use the same item as you use for products if you choose. Otherwise, create items in QBD that will be used to map the following:
- Gift Certificate Item
- Rush Order Fee Item
- Digitizing Fee Item
- Artwork Fee Item
- Screen Setup Fee Item
- Extra Charge Item
- Freeform Item
- Order Discount Item
- Coupon Discount Item
- Order Credit Item
- Tax Adjustment Item
To Create an Item
- From the main menu, select Inventory > Item List.
- From the Item List dialog, select Item > New.
- In the New Item dialog, select a Type (Inventory Part, Non-inventory Part, Service, Other Charge, Discount or Sales Tax Item).
- Enter an Item Name/Number and any other necessary information.
- Click OK.
Configure Taxes
Taxes configured in QBD should match the tax rates that are used in your DecoNetwork store and set to run in the same locale.
To Configure a Tax
- From the main menu, select Lists > Item List.
- From the Item List dialog, select Item > New.
- In the New Item dialog, select "Sales Tax Item" from the Type list.
- Enter the Sales Tax Name, Description and Tax Rate
- Optionally enter a Barcode Number and specify a Tax Agency, if relevant.
- Click OK.
Configure Payment Methods
The payment methods that are configured in DecoNetwork must have a corresponding method in QBD. Go to Admin > Settings > Payment Methods to view the payment methods in DecoNetwork.
To Create a Payment Method
- From the main menu, select Lists > Customer & Vendor Profile Lists > Payment Method List.
- From the Payment Method List dialog, select Payment Method > New.
- In the New Payment Method dialog, enter a name for the Payment Method.
- Select the Payment Type.
- Click OK.
Configure Payment Terms
Ensure the payment terms configured in QBD match those in DecoNetwork under Admin > Settings > Customer Settings > Account Terms
If the terms page has not been modified in DecoNetwork, you will need to add Cash On Delivery into QBD. Add a period of time equal to your minimal production time as the due period in QBD.
To Configure a Payment Term
- From the main menu, select Lists > Customer & Vendor Profile Lists > Terms List.
- From the Terms List dialog, select Terms > New.
- In the New Terms dialog, enter a name for the Terms.
- Configure the terms settings.
- Click OK.
Set up Vendors
Ensure the vendors defined in QBD match those in DecoNetwork under Admin > Products > Supplier Account Details.
To Define a Vendor
- From the main menu, select Vendors > Vendor Center.
- From the Vendor Center menu, select New Vendor... > New Vendor.
- Enter the vendor details.
- Click OK.
Configure Integration Options in DecoNetwork
The configurable items in DecoNetwork are each described briefly below with considerations and advice on the option used in most cases. Remember to click Refresh Lists to pull down the configuration information each time you make changes in QBD to any of the configuration items described in the previous section:
- Under Admin > Reports > Accounting Software Integration, click Configure.
- Click Refresh Lists.

- Configure mappings:
Order/Invoice Options
- Automatically Recalculate Pending Items - Choose whether you want DecoNetwork to recalculate items that need syncing, each time you apply the Sync Now command.
- If you choose ‘Yes’, DecoNetwork will automatically calculate items that need syncing and sync them.
- If you choose ‘No’, you will need to first view the sync queue to manually update the queue before you can sync the new pending items.
Typically choose Yes, unless you want to manually recalculate items affected by a QBD change.
- Order Syncing - Choose the stage at which you want order data in DecoNetwork to be synced with order data in QBD:
- Sync orders when they are invoiced: will sync orders once they are marked as invoiced (occurs when an order is marked as shipped, or manually marked as invoiced).
- Sync orders when they are placed: will sync orders as soon as they are placed.
- Sync orders when they are awaiting shipping: will sync orders when they are marked as production complete and have the Awaiting Shipping status.
- Sync orders when they are shipped: will sync orders when they are marked as shipped.
- Exclude Orders Before - Transactions from DecoNetwork will not be synced if they occurred before this date. Leave blank to include all orders. However, if there is a cutover between which system is handling orders, you may consider using that date as the exclusion date. Typically left blank to include all orders.
- Include Test Orders - Choose whether you want test orders to be sent to QBD while your site is in testing mode.
- Choosing ‘Yes’ will allow you to test syncing before you go live.
- If you choose, ‘No’ no data will be sent to QBD until you go live.
Typically set to No, unless you want orders from your site, while not live or in testing, to be sent to QBD.
- Test Mode - While set to ‘Yes’, DecoNetwork will only send 1 order and 1 purchase order to QBD at a time. Once you are happy that the transactions are being handled properly, set it to ‘No’ so QBD becomes live-updated by DecoNetwork. Start with this set to Yes and change to No when you are confident in the system.
- QuickBooks Version - Select the version of QuickBooks Desktop you are using.
- Accounts Receivable - Select the revenue account that will be used to receive money from sales/invoices.
- Deposit Into Separate Accounts - The default setting of ‘No’ will place all funds received by DecoNetwork into a single account called Undeposited Funds. Changing this to ‘Yes’ requires the definition of accounts to receive funds for each payment type which may better suit your accounting requirements.
- Tax Method - When transferring tax amounts into QBD, you can either assign the tax against the order or add each tax as a line item. If you assign the tax against the order, the calculated tax can differ between QBD and Deconetwork so a 'tax adjustment' line item may need to be added. You will also need to define tax groups to handle all possible combinations of taxes.
- Tax Included Code - This is the QBD 'Tax Included' tax code to use when tax is applicable.
- Tax Exempt Code - This is the QBD 'Tax Exempt' tax code to use when tax is not applicable.
- Quickbooks Class - If you have a class in QBD against which all DecoNetwork orders will be stored, select it here. This can be used for easier reporting and tracking of DecoNetwork orders.
- Customer Syncing - Choose a customer syncing option:
- Create a Quickbooks customer account for all account holders, but use the same Quickbooks customer for all other Internet orders: choose this option if you want DecoNetwork to automatically create a customer account for each customer who is an account holder and use a single customer account to record orders for customers who are not account holders.
- Create a Quickbooks customer account for all orders: choose this option if you want DecoNetwork to automatically create a customer account for all orders
- Use the same Quickbooks customer for all orders: choose this option if you want to use a single customer account to record orders for all customers
The default option of using a QBD customer account for all orders gives the best detail. The other options of using a single customer account for either all orders or just for internet orders both reduce the number of QBD accounts but at the cost of detail. Typically this is set to create a customer account for all orders.
- Single Customer - If, for the customer syncing option, you choose to use the same customer account for all orders or for customers who are not account holders (option 3 or option 1), this generic customer will be used for syncing.
- Customer Name - Set to show either the person or the company name when displaying the account in QBD.
- Customer Name Format - Choose how customer names are stored in your QBD file.
- Use Same Item? - Choose whether you want to use the same item to record all line items ordered in DecoNetwork:
- If you choose ‘Yes’, DecoNetwork will sync all order line items to a single item in QBD (i.e. Use the same product in each order line in QBD).
- If you choose ‘No’, DecoNetwork will record all order line items as separate products in QBD (i.e. Import the product specifics with each order from DecoNetwork).
This is typically set to No so DecoNetwork items are imported into QBD.
- Item Account - If you selected No for Use Same Item, DecoNetwork will import all your (blank) products into an item account of your choice in QBD. Choose an item account from the drop-down list.
- Item Expense Account If you selected No for Use Same Item, you will also need to select an expense account for the purchase of blank products to be resold. The expense account is used when purchasing.
- Sync Purchase Orders - If enabled, purchase orders are sent to QBD. If purchase orders are being used in DecoNetwork, set to Yes.
- Purchase Orders Account - If Sync Purchase Orders is set to Yes, then this field is used to define which account is making the purchase orders in QBD. This account comes from the chart of accounts in QBD, typically "Cost of Goods Sold" or similar.
Order Line Item Mappings
If you have chosen to set up separate line items in QBD for additional service items, (i.e. fees, charges, credits, and discounts), that you have configured in Deconetwork, these are configured here. Items can include:
- Shipping Item
- Gift Certificate Item
- Rush Order Fee Item
- Digitizing Fee Item
- Artwork Fee Item
- Screen Setup Fee Item
- Extra Charge Item
- Freeform Item
- Order Discount Item
- Coupon Discount Item
- Order Credit Item
Select the account you have designated in QBD for each of the fees from the drop-down list. If the drop-down list is empty or incomplete, ensure you have created these accounts in QBD and clicked Refresh Lists in DecoNetwork.
Shipping Methods
Select the corresponding shipping methods you have configured in QBD for each of the suppliers you use in DecoNetwork.
Taxes
The different taxes that you support should have corresponding accounts configured in QBD. Select them here from the drop-down boxes.
Payment Methods
The different payment methods that you support should have corresponding accounts configured in QBD. Select them here from the drop-down boxes.
Payment Method Deposit Accounts
Select the accounts that each payment method will deposit money into from the drop-down boxes. This should be an account such as "Undeposited Funds" or another current asset.
Payment Terms
Set Default Terms for new transactions and the corresponding additional terms you have configured in QBD. They should match what payment terms DecoNetwork already has configured.
Vendors
Select the corresponding vendor accounts you have configured in QBD for each of the suppliers you use in DecoNetwork.
- Automatically Recalculate Pending Items - Choose whether you want DecoNetwork to recalculate items that need syncing, each time you apply the Sync Now command.
- Click Save.
Complete and Test the Configuration
The final steps are to make sure the configuration is correct and that QBD is receiving data from DecoNetwork in the expected fashion. Initially, this is in test mode where only a single order, purchase order, and payment are synced with every push. Once you are satisfied the systems are working together correctly, put DecoNetwork into Live mode.
- Load the WebConnector tool to initiate a sync by clicking Update Selected.
- Once syncing is complete, check the status by clicking View Sync > View Sync History on the QBD Integration page.
This outlines the sync that took place. View the details by clicking View Log. Any errors will be revealed, which should be rectified.
- Once any errors have been fixed, run another sync using the WebConnector tool.
- Repeat the process until no more errors are appearing.
- Once testing is complete, take integration out of Test Mode.
Take the Integration Out of Test Mode
- Click Configure.
- Set Test Mode to No.

- Click Save.
- Load the WebConnector tool and run a sync.
Syncing your data
You can schedule your data to be synced to QBD on a regular basis by using the Auto-Run feature in the Quickbooks Web Connector. You can also run a sync manually whenever you like.
To set Auto-Run in the Web Connector:
- Open the web connector from within QuickBooks Desktop: File > Update Web Services.
- Once the Web Connector is open, tick the checkbox next to your company name.
- Tick the Auto-Run checkbox and enter a value (in minutes) in the Every _ Min field.
- Click on the Update Selected button.
To initiate a sync manually:
- Browse to Admin > Reports > Accounting Software Integration.
- Click the Sync Now button at the top right.
Accounting Sync Queue
The Sync Queue shows the entries of pending sync requests that are waiting to be synchronized into QuickBooks Desktop the next time a sync is initialized. When there are any updates to your customer, invoice, product, order, and transaction data in DecoNetwork, a record will be added to the sync queue. During the next synchronization, successful syncs will be removed from the queue and any failed sync attempts will be added back to the queue with an error message detailing the reason why the sync failed.
- Browse to Admin > Reports > Accounting Software Integration.
- Click the View Sync button at the top right toolbar and select View Sync Queue.
The sync queue is displayed in the work area.
- Type: You can filter the search queue by the following types; order, customer, product, payment, refund, credit, and purchase order.
- Name: You can search for records by name. Enter the name in the search field and click Search.
You need to enter the name exactly as it is stored in the system. Copy it from your sync log to make sure you have entered it correctly.
- Status: You can filter the search queue by the following statuses; Not synced, Waiting, Blocked, Error, and Synced.
- Last Result: Shows the outcome of the last sync.
- Last Error: Shows the error message of the entry resulting from the last sync. In order for the next sync to be successful, you need to rectify an error, then tell DecoNetwork that the record needs to be synced again so it can be recreated. To do this, click the Actions button next to the record and select Unmap from the dropdown. Performing these steps will put the record back into the sync queue to be sent over to the accounting software on the next sync attempt.
- Block: You can choose records to be omitted from the next sync by ticking the Block checkbox corresponding to the record.
Sync History
The Sync History page shows a report of past sync attempts. For each sync attempt, the date, state, and result are shown. The sync history page is a valuable tool to monitor and troubleshoot integration issues.
- Browse to Admin > Reports > Accounting Software Integration.
- Click the View Sync button at the top right toolbar and select Sync History.
The Sync History page is displayed in the work area.
Comments
2 comments
Hi Lee Prazner
This is Juan Caicedo from line dot corp, we are trying to implement the connection of QB enterprise desktop with Deconetwork, we have been using it for more than 7 years but now we want to do the connection due to the advantages that this software generate.
We already read the entire guide but we have some issues and my be with a short cnverstaion we can resolve many issues or you can orient us in the right direction.
You can contact us or let us know how would be the best option the go.
best regards
Juan and Isabella.
jcaicedo@gmail.com or isabellaa.lopezg@gmail.com phone number +17867970004
Juan Camilo Caicedo Caicedo, thank you for reaching out! We’re glad to hear you're looking to integrate QB Enterprise Desktop with Deconetwork. For assistance with your specific connection issues, I recommend contacting our client services team directly. They’ll be able to guide you through the process and help resolve any challenges you're facing.
You can find the contact details to get in touch with our team on this page: Deconetwork Contact Us.
Please sign in to leave a comment.