
Learn how store designs work in DecoNetwork, how they differ from stock designs, and how to manage them in your account. Store designs let customers customize the products you sell and can be offered in different ways – free to use, sold as paid designs, or included in pre-decorated products. You can also protect uploaded designs with watermarks to help prevent casual copying while still allowing customers to preview them during customization.
In this article
- Prerequisites
- Why store designs matter
- Manage store designs
- Configure a store design
- Upload new designs
- Watermark store designs
- Sort designs
- Best-practice tips
- Troubleshooting
- FAQs
- Additional resources
Prerequisites
- Administrator access to your DecoNetwork website
- A Premium or Enterprise plan to manage store designs
Why Store Designs Matter
Store designs are the graphics and design templates that you upload or enable on your website for use by customers to decorate products in your store. They allow customers to personalize products while keeping control over which artwork is available and how it is presented.
- Improve customer engagement during product customization
- Maintain brand consistency across your store
- Control which designs are available for ordering
Manage Store Designs
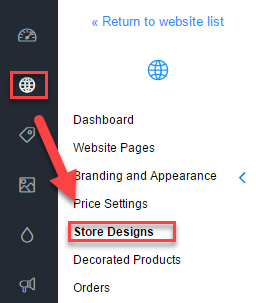
- Log into your DecoNetwork Website.
- Browse to Admin → Websites → Manage.
-
Select Store Designs.
The main work area displays a list of existing designs that may be managed (configured or deleted) via the corresponding Manage button. The decoration processes that the design can be used with are listed in the store designs table, along with a preview image of the design. The top bar contains menus to upload new designs, watermark store designs, and sort your designs. A search function is available via the search and advanced search boxes. Designs can be organized into categories which are displayed in the treeview on the left side of the screen.
-
Review the list of existing designs. Use the Manage button beside a design to edit or delete it.
Clicking Manage against a design presents you with some options depending on whether the design is a raster design or a template and whether it is a design added from stock design collections or whether it is your own design.
- Configure lets you view basic details about the design, including name, image type, and color information, configure decoration processes for the design and, if the design is your own, you can specify meta information for the design. The Configure option will be available for all designs. (See the article, Configure a stock design, for more information on configuring a design).
- Edit Template will launch the Template Builder if the design is a custom template, allowing you to edit the template design. Only custom templates (template designs that you have created yourself) can be edited. Designs from stock design collections are NOT editable. However, they can be customized by the customer in the template's permitted areas - such as names and numbers - as defined by the template itself. (See the article, Create a template design, for more information on using the Template Builder).
- Copy lets you create a copy of custom template designs. This allows you to use a pre-made layout to quickly create a new template design with a few edits without having to start from scratch. Only custom templates (template designs that you have created yourself) can be copied.
- Delete will remove the design from the Stock Designs List. Designs from stock design collections cannot be deleted. To remove a design from a collection, you must remove the collection in its entirety.
Configure a Store Design
-
Click the design name or select Manage → Configure.
The Edit Store Design screen opens, allowing you to configure the design properties.
- Update the design details:
-
General
- Name is a label for the design.
- Description is used in conjunction with the design name.
-
Category defines where on the treeview the design will reside.
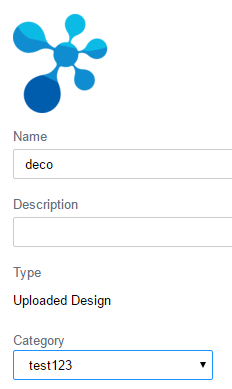
- Type describes what sort of design has been uploaded. The options are Uploaded Design - a graphic you have uploaded, DecoNetwork Template - built in the DecoNetwork template builder, or Stock Design - imported from a stock design library that has been made available by your fulfillment center.
- Image Type: show the image type of the design (Raster, Vector or EMB).
- Color shows the color type of the design (Full Color or Low Color).
- Number of colors: shows the number of colors present in the design.
-
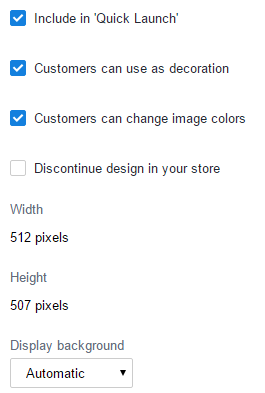
Include in 'Quick Launch' will add the design to the quick launch widget on pages that are using it. This makes the design immediately available for use in decorations.
The Quick Launch feature is only available if you are using a v7.5 theme. If you are using a newer theme, this option will not be available.
- Customers can use as decoration will make the design available in the web store for customers to use.
- Customers can change image colors lets customers remap the colors in the design as they please, within the constraints of the chosen decoration process if that imposes any limitations.
- Discontinue design in your store deletes the design from your store designs.
- Width and height show the dimensions of the design.
-
Display Background lets you configure the background color of the design displayed on the website:
- Automatic will automatically display a color that provides optimal visibility of the design depending on the design colors.
- Always white will always display a white background behind store designs.
- Always black will always display a black background behind store designs.
- Other lets you specify a color by entering a hex code.
-
Date Added shows the date on which the design was added.
-
Processes shows you which processes are available for the design.
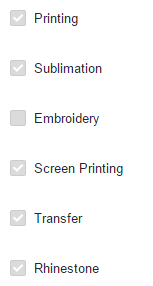
The processes are automatically assigned according to the production settings and cannot be edited.
-
Meta Information lets you view and override the default meta information associated with the page that displays the design in your online store. Search engines often use the data to index your website. You should review the search engine optimization (SEO) topics for further information. You can view and override the page title, meta keywords, and meta descriptions.
-
Page title will appear in the title bar of your browser when viewing the product. Ticking Override default lets you edit the page title. -[STORE_NAME] is appended to the end of the page title and is dynamically replaced with the web store's configured name.
-
Meta keywords are used by some search engines to identify the topic and content of a page. Tick Override default to edit the keywords for the design page.
-
Meta description will appear in the preview of most search results and provide potential visitors with a short description of your design page. Tick Override default to edit the description.
-
Meta Index - Prevent search engines from indexing this page: This option lets you choose whether or not you want search engines to include the design page in search results and follow the links on your page.
Ticking the checkbox will include a "noindex" meta tag in the page's HTML code to prevent the design page from appearing in the search engine's search results.
This is useful for preventing duplicate content in the design page from coming up in the search results for your site and redirecting traffic to more relevant pages on your site.
-
-
General
- If the design is a custom Template, you can click Edit Template to open the Template Builder to make changes to the design. (See the help article, Create a template design, for more information on using the Template Builder).
Upload New Designs
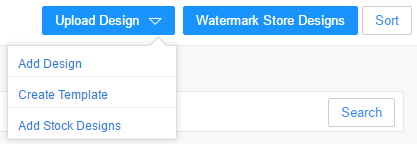
- Clicking Upload Design and choose from one of the following options:
- Add Design lets you choose a design file to upload and configure as per the above section.
- Create template starts the DecoNetwork template designer which lets you place graphics and compose text to build a new design template. The template can have elements defined as editable by customers so they can customize it to suit their needs.
-
Add Stock Design displays a list of stock designs that the Fulfillment Center has made available to affiliates. These may then be made available through the affiliate store to customers if desired. Note that these designs may have fees for use depending on the creator's terms of use.
Watermark Store Designs
- Click Watermark Store Designs.
- Enter watermark text to protect your artwork from unauthorized reuse.
Sort Designs
- Click Sort on the Store Designs page.
- Reorder designs manually or sort them by name or price.
Best-Practice Tips
- Group designs into clear categories to help customers find them faster.
- Use descriptive names so designs are easy to identify in the admin area.
- Upload optimized image files to ensure faster loading in the designer.
- Regularly review and remove outdated or unused designs.
Troubleshooting
-
I can’t see the Store Designs menu
Ensure you are logged in as an administrator and that your plan supports store designs. -
A design isn’t visible to customers
Check that the design is enabled and assigned to an appropriate category. -
I can’t edit a design
Stock designs cannot be edited or deleted – only custom store designs can be modified.
FAQs
-
What’s the difference between store designs and stock designs?
Store designs are managed by you and can be edited or removed. Stock designs are provided by the system and cannot be modified. -
Can customers upload their own designs?
Yes, customer-uploaded artwork appears as “My Designs” and is separate from store designs. -
Do watermarks appear on finished orders?
No, watermarks are only for preview protection and do not print on final products.
Additional Resources
- How to Upload Store Designs Within a Website
- Manage Store Design Categories
- Using the Template Builder
- What is the difference between stock designs, store designs and templates?
Still have questions? Use the Search Tool at the top of the page to find more related guides. Need help? Click the icon to submit a support ticket—our Client Services team is ready to assist!
Comments
0 comments
Please sign in to leave a comment.