
Store Checkout Options let you customize how the checkout experience behaves for an individual store. These settings override the Fulfillment Center defaults and allow you to tailor shipping dates, pricing transparency, and other checkout behaviors to suit a specific store's requirements.
Use these settings when a store requires different checkout behavior from the Fulfillment Center standard configuration.
In This Article
- Prerequisites
- Why use Store Checkout Options?
- Step 1: Open Store Checkout Options
- Step 2: Enable Override Default Settings
- Step 3: Configure Checkout Options
- Best-Practice Tips
- Troubleshooting
- FAQs
- Additional Resources
Prerequisites
- You must have administrator access.
- You must have access to manage a store.
- The Fulfillment Center must permit store-level configuration where applicable.
Why use Store Checkout Options?
Store Checkout Options let you customize the checkout experience without affecting other stores.
- Override Fulfillment Center checkout defaults for a specific store.
- Control how customers interact with ship-by dates.
- Improve pricing transparency during checkout.
- Create a checkout experience tailored to each store's business requirements.
Step 1: Open Store Checkout Options
- Log into your DecoNetwork Website.
-
Admin → Websites.
-
Click on the Manage button beside the store you want to configure.
Manage Button
-
Select Store Configuration → Checkout Options.
Checkout Options Menu Item
The Checkout Options page will open.
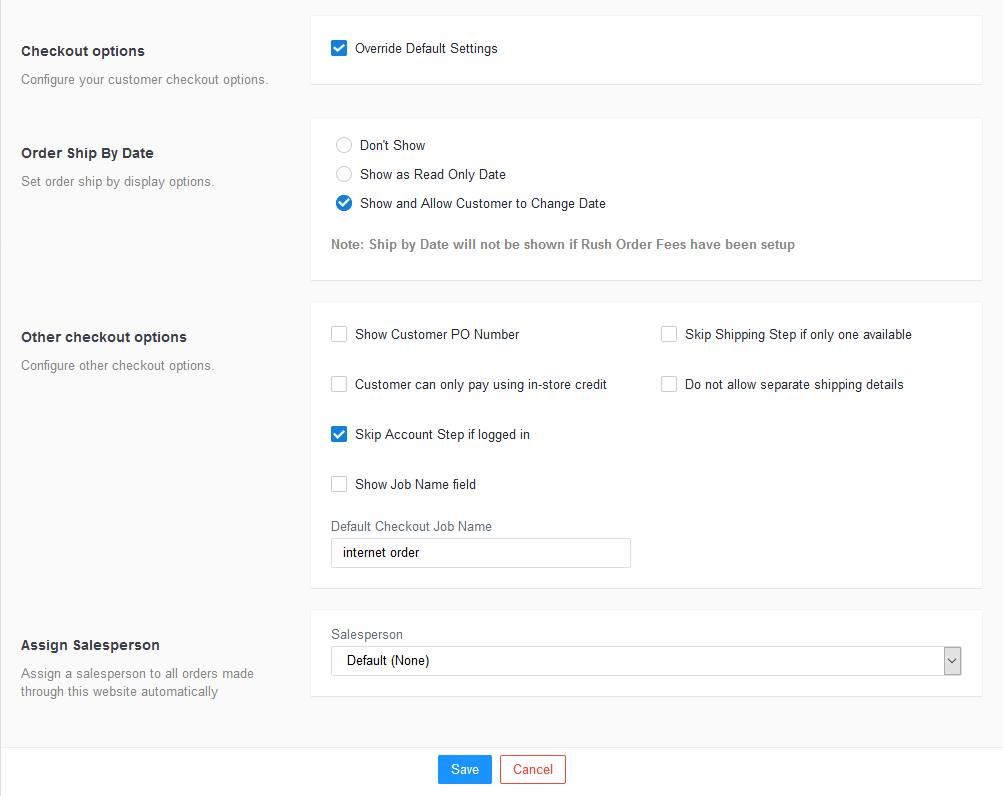
Store Checkout Options page.
Click the image to enlarge.
Step 2: Enable Override Default Settings
-
Tick the 'Override Default Settings' checkbox.
Checkout Behavior Setting
Once enabled, the store can use its own checkout configuration instead of inheriting the Fulfillment Center defaults.
Step 3: Configure Checkout Options
-
Select an Order Ship By Date display option:
Order Ship By Date Settings
- Don't Show: When selected, the expected ship-by date will not be displayed during the checkout process.
-
Show as Read Only Date: When selected, the expected ship by date (that cannot be changed) will be displayed during the checkout process (Shipping options page - Step 2 of 4 of the checkout process).
-
Show and Allow Customer to Change Date: When selected, the expected ship by date will be displayed during the checkout process (Shipping options page - Step 2 of 4 of the checkout process). The customer will be able to change this date if they want. Clicking on the calendar icon beside the field will display the date picker.
-
Configure the Other Checkout Options:
Other Checkout Options
-
Show Customer PO Number: When checked, the Customer PO number field is displayed allowing the customer to enter a purchase order number. The Customer PO Number field will appear on the Shipping options page (Step 2 of 4 of the checkout process).
-
Customer can only submit orders on account terms: when this checkbox is ticked, the payment step in the checkout process will only allow submitting orders on account terms.
If a customer is at their online balance limit, the website will not allow the customer to proceed with the order. The online balance limit is set via the customer view in Business Hub. It is set on a per-customer basis.
Customers who do not have account terms assigned will also be unable to proceed with the order.
When this setting is enabled, the payment page will load with the Submit on Account Terms option ticked and disabled. Payment methods will be hidden if a deposit is not required.
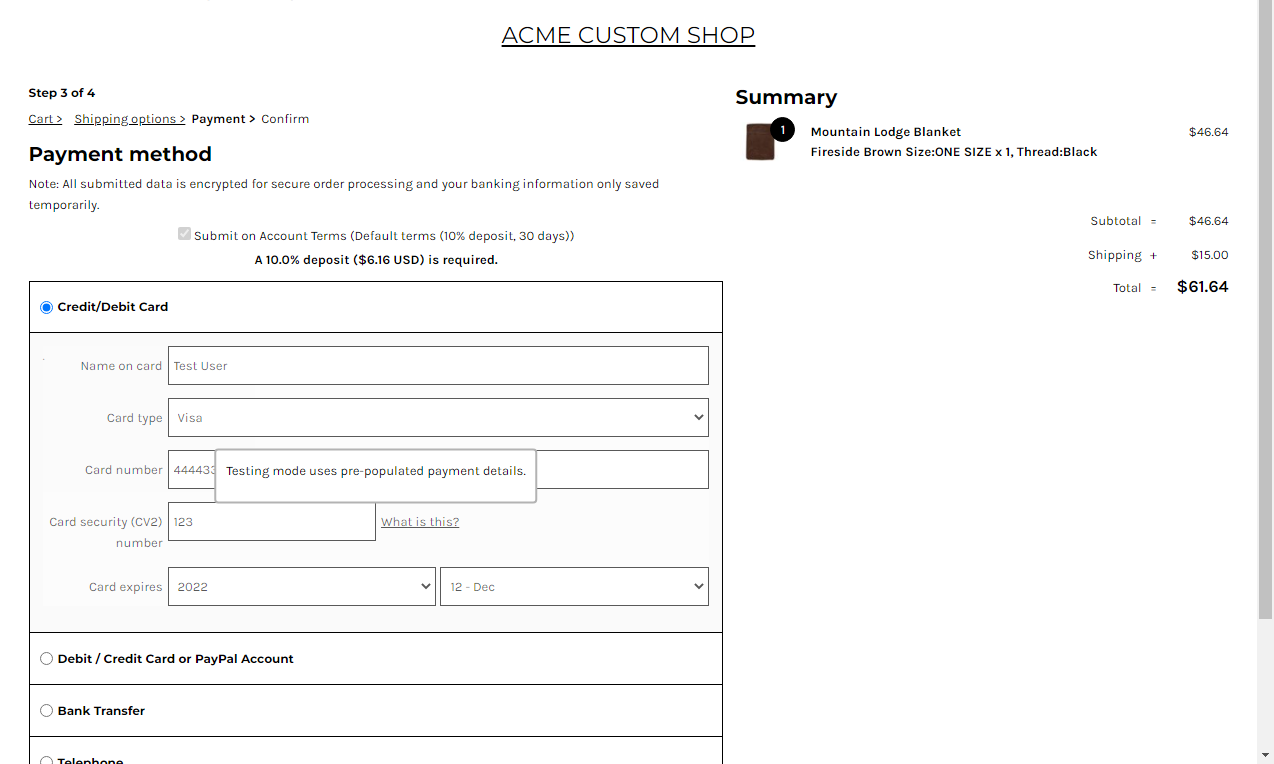
Click the image to enlarge.
-
Customer can only pay using in-store credit: When checked, the customer is only able to pay for the order using their store credit balance.
If this option is ticked, the Payment step of the checkout process will indicate that account credit will be used to pay for goods. Enabling this option while not having any or enough store credit set will prevent purchases of any products. The customer will be informed of inadequate credit at the confirmation step of the checkout process.
Note, store credit is set on a per-customer basis. - Skip Account Step if logged in: When checked, the customer is not required to enter their account details if they are already logged in.
- Show Job Name field lets you choose whether to allow the customer to edit the job name when placing an order in the storefront.
- Default Checkout Job Name lets you specify a default job name for website orders.
- Skip Shipping Step if only one available: When checked, the Shipping step is skipped if only one shipping method is available.
-
Do not allow separate shipping details: When checked, the user will not be given the option to provide a shipping address that is different from the billing address.
If this option is un-ticked, the Separate shipping address checkbox will appear on the Address page (Step 1 of 4 of the checkout process).
-
Show cart pricing breakdown popup: When enabled, customers can view a detailed pricing breakdown from the View Cart page by selecting the pricing information icon shown beside the unit price.
New in V8.611.This is setting is particularly useful when a product contains multiple sizes that have different blank prices.
The popup may include:
- Blank product price per size
- Decoration pricing
- Additional option pricing
- Average unit price calculations
- Rounded average unit price calculations
- Tax information when separate taxes are enabled
This setting is disabled by default.
Tip: Enable this setting if customers frequently order multiple garment sizes and ask how pricing is calculated.Note: Multiple-size products remain combined into a single cart line item so that volume discounts continue to work correctly. The pricing breakdown popup provides additional transparency without affecting discount eligibility.Example pricing breakdown popup shown from the View Cart page.
-
-
Assign a salesperson for orders made through this store:
Click on the Salesperson field to open a dropdown list of salespersons. The selected salesperson will be automatically assigned to all orders placed on this store through the website and through Business Hub.
- Click Save.
Best-Practice Tips
- Only override Fulfillment Center defaults when a store has unique requirements.
- Use a read-only ship-by date if production schedules are fixed.
- Allow customers to change ship-by dates only if your business can accommodate schedule adjustments.
- Enable the pricing breakdown popup for stores that sell apparel in multiple sizes.
- Review checkout settings whenever introducing new pricing rules or promotional campaigns.
- Periodically verify that store overrides are still necessary and aligned with Fulfillment Center standards.
Troubleshooting
The pricing breakdown popup is not appearing.
- Ensure Override Default Settings is enabled.
- Verify Show cart pricing breakdown popup is enabled.
- Confirm you are viewing the cart page.
- Refresh the website cache and reload the page.
The ship-by date cannot be edited.
Verify that Show and Allow Customer to Change Date is selected.
The store is still using Fulfillment Center settings.
Ensure Override Default Settings has been enabled and saved.
FAQs
Does enabling Store Checkout Options affect other stores?
No. Changes only apply to the selected store.
Does the pricing breakdown popup split products into separate cart lines?
No. Products remain combined into a single cart line item.
Why are products not split by size?
Splitting products into separate lines would prevent customers from receiving quantity-based volume discounts correctly.
Can customers see taxes in the pricing breakdown?
Yes. Tax rows are displayed when separate taxes are enabled.
Is the pricing breakdown popup enabled by default?
No. The setting is disabled by default and must be enabled at either the Fulfillment Center or store level.
Additional Resources
Still have questions? Use the Search Tool at the top of the page to find more related guides. Need help? Click the to submit a support – our Client Services team is ready to assist!
Comments
0 comments
Please sign in to leave a comment.