
Email templates control the automated notifications DecoNetwork sends to customers, staff, suppliers, and campaign owners. They are designed to streamline communication with your customers by providing flexibility while reducing the overhead of setting up separate communication channels. The content and layout of the emails are fully customizable, so you can deliver messages in the exact look, feel, and tone your business requires.
Templates use Liquid, a lightweight templating language, to insert dynamic variables (such as customer names or order numbers) and apply simple logic. They also support HTML and CSS for full control over formatting and design, enabling you to create branded, professional communications.
This article explains how to configure and customize email templates to ensure your automated notifications are consistent, on-brand, and effective.
In This Article
- Prerequisites
- Why Configure Email Templates?
- Available Template Categories
- Step 1: Navigate to Email Templates
- Step 2: Select a Template
- Step 3: Configure Settings
- Step 4: Apply Conditional Logic
- Step 5: Save Changes
- Liquid Primer for Email Templates
- Examples & Use Cases
- Troubleshooting & FAQs
- Additional Resources
Prerequisites
- Administrator access to your DecoNetwork site
- To set up the order-reply email address you need to contact your domain name administrator
- Email & Order Templates app enabled (required for template customization on Standard or lower plans)
- Knowledge of HTML/CSS if you plan to customize email layouts
Why Configure Email Templates?
Customizing your email templates provides several benefits:
- Consistent branding — ensure all customer-facing communication matches your brand voice.
- Improved clarity — avoid confusing system defaults and reduce support inquiries.
- Automation control — customize when and how templates are used, especially per shipping method.
- Operational visibility — CC or BCC team members so they are notified at key points in the order process.
Available Template Categories
Templates are organized into categories, each serving a different function:
| Category | Purpose | Notes / Conditions | Templates | |
|---|---|---|---|---|
| User Account Emails |
|
Generated when users sign up or forget/change their password; confirms registration and communicates key account actions. | Helps users regain access securely and confirms account changes. | User-registration email; Account-welcome email; Forgotten password email; Password changed email; Login using email |
| Web Store Order Emails |
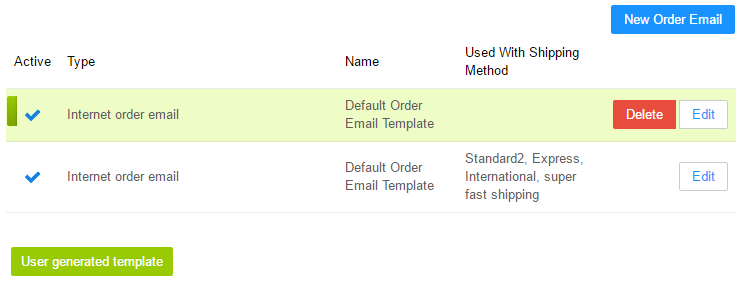 |
Order confirmation emails sent immediately after a successful online purchase. | Not used for Business Hub orders. “Used With Shipping Method” controls when a template is used so different shipping instructions can be sent per method. “New Order Email” lets you create additional templates. | Internet order email — Default Order Email Template (methods shown: Standard, Express, International, In store pickup, Discount Shipping, Free for Orders Above $50) |
| Web Store Quote Emails |
|
Sent immediately after a customer submits a quote request via the storefront. | Shipping method not applicable (N/A). | Internet quote request email — Default Quote Email Template |
| Business Hub Quote & Order Emails |
 |
Used when Business Hub orders/quotes are created, produced, shipped, or canceled; keeps customers informed throughout the BH workflow. | Not activated for online store orders. Only the Order-shipped template supports per-shipping-method assignment. “New Shipped Email” lets you add another shipped template. | Order-shipped email — Default Order Shipped Email Template (methods listed); Quote sent to customer email — SYSTEM: Quote; Order sent to customer email — SYSTEM: Order Review; Order cancelled email — SYSTEM; Order produced email — SYSTEM |
| Payment Emails |
|
Communicate payment events such as received, confirmed, rejected, requested, statements, and manual instructions. | Reduces payment-related inquiries and supports smooth order processing and finance comms. | Account-statement email; Payment thank you email; Deposit request email; Account payment request email; Payment-rejected email; Payment-confirmed email; Order payment request email; Manual payment instructions email |
| Customer Contact Emails |
|
General correspondence with customers, including abandoned cart follow-ups. | “Remove saved layouts warning” auto-sends after 50 days of inactivity, warning removal after 10 additional days; “Customer email” is sent from the Customer Account page in Business Hub; “Note to customer” sends when a note is created on a quote/order. | Note to customer email; Abandoned cart follow-up email; Remove saved layouts warning; Customer email |
| Store Owner Emails |
|
Notify the store owner about site-wide events such as store created, sales, or account verification. | Streamlines owner comms and verification processes. | Store-created email; Site-made-sale email; Resend Account Verification; Store Owner Note |
| Staff Account Emails |
|
Notify staff when they’re assigned an order, production item, or artwork job; includes order event alerts. | Supports accountability and internal workflow coordination. | Order assigned email; Production Item assigned email; Artwork Job assigned email; Order event email |
| Supplier Emails |
|
Send purchase orders to suppliers to initiate procurement. | Essential for clear supplier comms, minimizing errors, and ensuring timely delivery. | Purchase Order |
| Campaign Owner Emails |
|
Update campaign owners when a note is posted or the campaign is created, finished, canceled, or moves into production. | Supports clear communication across the campaign lifecycle. | Campaign Owner Note; Campaign Created; Campaign Finished; Campaign Cancelled; Campaign Production |
| Artwork Emails |
|
Support the artwork approval process and related customer communications. | Used to request customer approval or send artwork-specific notes/updates. | Artwork approval request to customer email; Artwork note to customer email |
Template color codes:
Color labels are used to indicate various statuses for the email templates:
- Gray = inactive
- Green = overridden
- Blue = user-generated
Step 1: Navigate to Email Templates
- Log into your DecoNetwork website and click Admin.
- Go to Settings → Email and Order Templates.
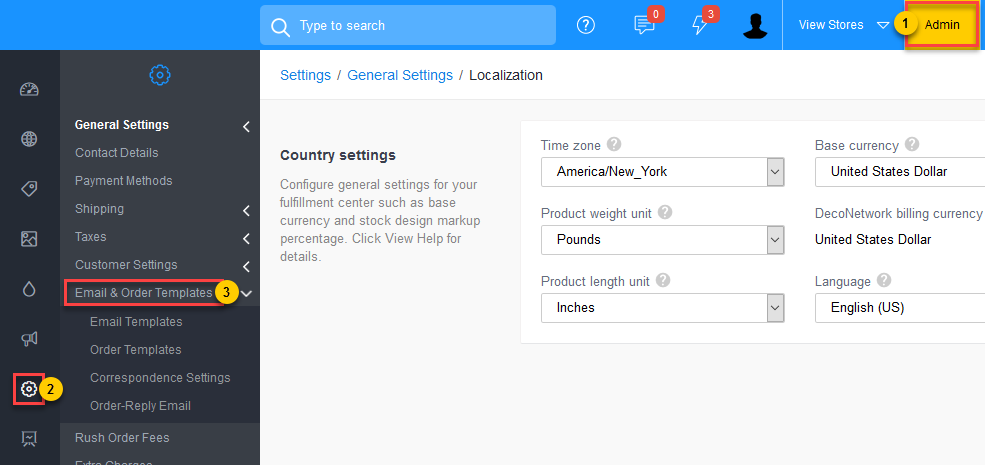
Click the image to enlarge.
- Click Email Templates.
Email templates page
Step 2: Select a Template
- Browse categories to find the template you want to edit.
- Click Edit next to the template you want to modify.
Step 3: Configure Settings
Typically, you can set the availability of the email, modify additional recipients of the emails so relevant people in your company can be notified of particular events, you can override your default marketing message (see Correspondence Settings), view the default template, and customize the default template.
- Configure the template as desired.
The configuration options are separated into sections.
-
Select a tab from the sub-menu at the right to edit/view the desired section.
- General — toggle Active/Inactive, set CC/BCC
- Marketing Messages — HTML & plain text versions; untick “Use Default” to override
- Default Template — view-only system template
- Customize Template — edit subject line, HTML, and plain text body; tick “Override default template” to enable
General
You can toggle the email on and off by ticking/un-ticking the Active checkbox. The cc and bcc fields allow you to specify email addresses to which the email should be sent.
Marketing Messages
You can edit the marketing message that will be included in the content of the email. You can edit the message for both the plain text and the HTML versions of the email. Untick the Use Default checkbox to modify the default message.
Default Template
This section shows the code for the default template.
Customize Template
Note, if you are on the Standard plan or lower, you must enable the Email and Template app for the Customize Template feature to be enabled.
This section allows you to edit the template. You can edit the subject, the HTML version, and the plain text version of the email. Tick the Override default template checkbox to modify the default template.
Click the image to enlarge.
Usage
This Usage section is only available for the Order Email Template and Order Shipped Email Template.
If you are editing a default template, the options will be disabled. By default, all shipping methods will use the default template, unless specified to "Don't send" under the shipping method's General settings.
If you are editing a custom template, the options will be enabled, allowing you to choose which shipping method(s) will use this template.
Shipping methods that are currently set to "Don't send" under the shipping method's General settings are included in the list and are indicated by "Don't send" under the Current Template column. Ticking the checkbox for these shipping methods will override the shipping method setting and set the current template to be used for the shipping method.
Step 4: Apply Conditional Logic
- Order & Order Shipped templates support per-shipping method assignment.
- Disabled fields indicate you are editing a default template.
- Even if a shipping method is set to “Don’t send,” you can assign a template to it manually.
Step 5: Save Changes
- Click Save to apply.
Customizations apply only to new notifications after saving.
Liquid Primer for Email Templates
DecoNetwork email templates use Liquid—a lightweight templating language. You’ll use it to print variables (like customer name), apply filters (formatting), and add simple logic. If you’re new to Liquid, see our Liquid Crash Course (for DN order & email templates) in Additional Resources.
Scope matters: Available variables differ by template type (e.g., order emails vs. account emails). For a full list of placeholders specific to email templates, see Email Template Variable Descriptions in Additional Resources.
Liquid basics
-
Output (print a value):
{{ variable }}
Example:{{ customer.name }},{{ order.number }} -
Tags (logic/flow):
{% tag %}
Example:{% if order.total > 0 %}...{% endif %} -
Filters (format values):
{{ value | filter: 'arg' }}
Example:{{ order.total | money }},{{ order.ship_date | date: "%d %b %Y" }} -
Comments:
{% comment %} Notes here {% endcomment %}or{# short note #}(if enabled) - Plain text vs HTML: Compose both versions. Avoid HTML tags in the plain-text body.
Common variable patterns (email templates)
-
{{ store.name }},{{ store.email }},{{ store.url }} -
{{ customer.name }},{{ customer.email }} -
{{ order.number }},{{ order.total | money }},{{ order.status }},{{ order.shipping_method.name }} -
{{ payment.amount | money }},{{ payment.status }},{{ payment.reference }}
Tip: When in doubt, print a variable first to confirm it exists before styling it. Example: {{ order | json }} in a test email (then remove).
Control flow & loops
{% if order.shipping_method.name == "Express" %}
  <p>Thanks for choosing Express Shipping!</p>
{% else %}
  <p>Thanks for your order.</p>
{% endif %}

{% if order.line_items and order.line_items.size > 0 %}
  <ul>
  {% for item in order.line_items %}
    <li>{{ item.quantity }} × {{ item.name }} — {{ item.price | money }}</li>
  {% endfor %}
  </ul>
{% endif %}
Subject lines
You can use Liquid in the subject as well:
Subject: Your order {{ order.number }} has shipped via {{ order.shipping_method.name }}
Formatting filters (handy set)
-
| upcase,| downcase,| capitalize -
| strip,| truncate: 60 | date: "%d %b %Y"-
| money(use your store’s currency formatting)
Safe output & escaping
- Escape user-entered content when necessary:
{{ customer.note | escape }} - Keep sensitive values out of emails (e.g., do not print full card numbers).
Important: Use Liquid only to present data and simple logic. Do not attempt to change core behaviors with Liquid. For functional changes, configure settings (e.g., shipping rules, workflow) rather than forcing logic in templates.
Test & iterate
- Start with a copy: enable Override default template and edit the copy.
- Send yourself test emails (HTML and plain text) to verify layout and variables.
- Check different cases (e.g., Express vs Standard shipping, paid vs unpaid).
Examples & Use Cases
- Shipping-specific templates: Send different instructions for “Express” vs “Standard” shipping.
- Team CC: Add staff emails in CC to receive a copy of “Payment Received” notifications.
- Inactive fallback: Deactivating a template reverts to the system default or disables sending, depending on the template.
Troubleshooting & FAQs
| Problem | Possible Cause | Solution |
|---|---|---|
| Emails aren’t sending | SMTP or domain settings not configured | Check DNS records and verify order-reply email authorization with your domain admin |
| Override doesn’t appear | Template not active or override not enabled | Ensure Active is checked and Override default template is selected |
| Wrong template used | Shipping method mapping incorrect | Review “Usage” assignments under template settings |
| Color label not updating | Status not saved | Save again and refresh cache if needed |
Additional Resources
- Email Template Variable Descriptions — glossary of DN-specific email variables with descriptions.
- Liquid Crash Course (for DN email templates) — a standalone, step-by-step guide to variables, filters, loops, and best practices in the DN context.
- Official Shopify Liquid reference — language syntax and filters.
- How Do I Use the Variables Not in the Default Email Templates?
Still have questions? Use the Search Tool at the top of the page to find more related guides. Need help? Click the icon to submit a support ticket—our Client Services team is ready to assist!
Comments
0 comments
Please sign in to leave a comment.