
You may require specific data to be captured from your customers for your own unique business purposes. The Customer Fields feature lets you set up fields to collect additional information from your customers at checkout that are crucial to your business processes and that can help make your processes more efficient.
Watch the following video to see how to add custom fields and display the data on your order sheet. Read below for written instructions.
Prerequisites
- You must have administrator access to use this feature
In this article...
To Add a Customer Field
- Log into your DecoNetwork website and click Admin.
- Click Settings.
- Click Customer Settings.
- Click Customer Fields.

The work area of the Customer Fields screen gives you an overview of the customer information that is captured during the account signup and checkout processes.
- Scroll to the bottom of the page.
- Click Add Custom Field.

This will add a new row of data to the screen.
- Give the field a name (keep it descriptive and relevant).
- Choose what type of data will be stored.
Field types can be one of two categories
- Text: (a field of plain, typed text) such as "Text field"; or
- Select: (a list of options) such as "Dropdown".
- Configure the type of data by clicking Edit.
Configuration options for the new custom field are displayed in a popup. Options vary depending on the field type.
Text Field
Text Area
Select (Dropdown, Checkbox, Radio buttons, and Multiple-select)
- Start new line at this field: tick this checkbox if you want this field to be displayed on a new line.
- Label Width: Specify a width value, in pixels, for the field label.
- Container Width: Specify the width for the field input container as a percentage.
- Description: Specify a description that explains what data the field is trying to capture.
- Length: Specify the length for the field (Text Field only)
- Rows: Specify the number of rows that the field will contain. (Text Area only)
- Columns: Specify the number of columns that the field will contain. (Text Area only)
- Maximum Characters: Specify the maximum number of characters allowed.
- 'Select' type of fields provide a selection of choices from a list. You need to configure what those choices are. Below is an example of the custom field "Favourite Color" being set up with the options Red, Green, and Blue.

- Default sets which option will be selected prior to the user making a selection.
- When done, click OK.
- Click Save.
By default, the new field will be available, but optional, in all areas of your system where data is collected. You can specify where the field is available and whether it is optional or required by defining the field usage. See the tutorial below for instructions.
To Define Field Usage
Many of the places within DecoNetwork can use and request customer information at different times, and many of these are configurable. Some, as they are required by the system, are not configurable. To check these configurations, click Define Field Usage.
- Log into your DecoNetwork website and click Admin.
- Click Settings.
- Click Customer Settings.
- Click Customer Fields.
The Customer Fields screen is displayed in the work area.
-
Click on the
 button.
You will be presented with a matrix of customer fields, where they appear, and how they are used.
Click the image to enlarge.
- Configure the field usage as required.
Some options are not editable as they are required by the system for normal operation. Making an option Visible means that it will be available for the customer to fill in during signup or checkout. Making that option Required means the customer must also use that field, and failing to fill it in will reject the form being submitted with an error telling the user what they have done incorrectly.
- Click Save.
To Add a Custom Field to the Order Sheet
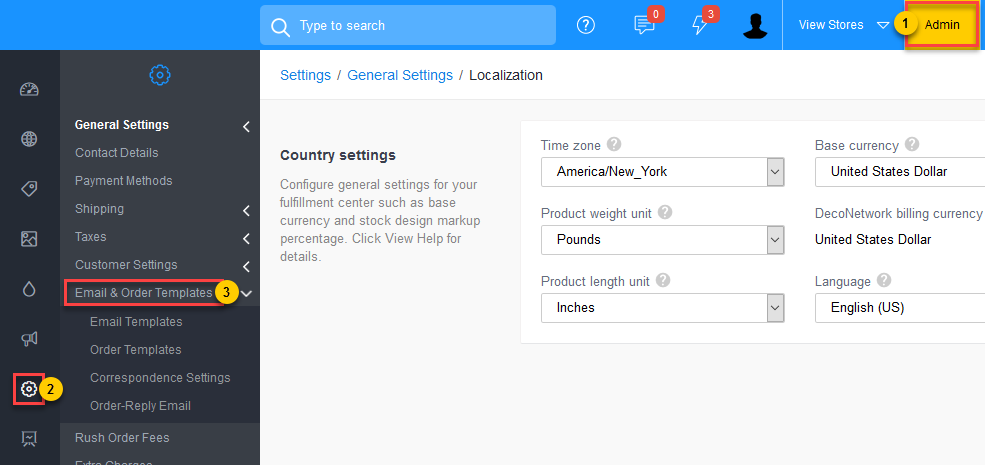
- Log into your DecoNetwork website and click Admin.
- Click Settings.
- Click Email and Order Templates.
Click the image to enlarge.
- Click Order Templates to display the list of order templates.
The Order Templates page is displayed.
Click the image to enlarge.
- Click Edit beside the Order template.
The order template edit page is displayed.
- Select Customize template from the menu at the left.
The Customize Template screen is loaded in the main work area. This section contains an editor allowing you to edit the code of the order sheet template.
Click the image to enlarge.
- Decide where you want to display the custom field on your worksheet. It is a good idea to click on Test Template (right upper corner) so you can see the default template.
Say you want to add a custom field right below the email address under the contact details as shown below:
- Locate this spot in the code. The easiest way to do it is by using the Find option in your browser. For example in Mozilla you can press Ctrl+F on the keyboard and the Find option will appear at the bottom of the page. Then type “email” in the Find field because you want the custom code to be added right below the email. The Find feature should take you to that place in the code.
- Once you find the code, you just need to add the variable along with the description right below the email.
The code to add the variable is in the format {{customer.custom_fields.xxx }}
Where xxx is the name of the field in lowercase, with all non-alphanumeric fields changed to "_"
i.e.: “Test Field” = “test_field”Note: A non-alphanumeric character is anything that is not A-Z or 0-9.
Say you have a custom field called "Student's Name". In this case, your variable is {{customer.custom_fields.student_s_name}}
To include the Student Name custom field in the Order template, for example, you can add this:
<span>Student's Name: {{customer.custom_fields.student_s_name}}</span>
as shown below:
Where <span></span> is the code that will display the student's name on the next line in the worksheet.
Student’s Name is the title for the content that comes next.
{{customer.custom_fields.student_s_name}} displays the information provided by the customer during the checkout.
- Click Save.
Comments
0 comments
Please sign in to leave a comment.