Three standard shapes – rectangle, circle, and rounded rectangle – are available to define a product’s decoration area, but items with irregular forms sometimes require a custom outline, such as star- or heart-shaped printable zones. This article explains how to create such a custom shape and apply it to a product in DecoNetwork when the default shapes don’t meet your needs.
Watch the following video for instructions on how to create and place custom decoration area shape masks.
In this article
- Prerequisites
- Why use custom decoration area shapes
- Step 1: Create a custom shape
- Step 2: Apply the custom shape to a decoration area
- Best-practice tips
- Troubleshooting
- FAQs
- Additional Resources
Prerequisites
- You must have Admin access to your DecoNetwork account.
- You need a graphics application (e.g., Adobe Photoshop or Corel PHOTO-PAINT) that supports transparency and PNG export.
Why use custom decoration area shapes
By default, DecoNetwork supports rectangle, circle and rounded rectangle shapes for decoration areas. These suffice for most products, but if you’re offering unique items — for example, a star-shaped promotional product or a Valentine’s heart-shaped print zone — using a custom shape mask ensures the decoration area maps precisely to the product’s printable surface. That means fewer alignment issues and better visual consistency for your customers.
Step 1: Create a custom shape
This tutorial details the procedure for creating a custom shape to be used as a decoration area mask.
- Open a graphics application that supports transparency, such as Adobe Photoshop or Corel PHOTO-PAINT.
- Create a new document with a transparent background.
- Draw the shape that you require with a solid, uniform color fill.
- Save the file in **PNG format** (preserving transparency).
Step 2: Apply the custom shape to a decoration area
- Log into your DecoNetwork Website.
-
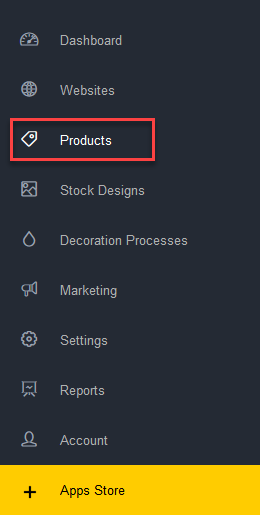
Browse to Admin > Products.


-
Select the product you wish to configure by either:
- Clicking on the product code.
- Clicking on the product name.
-
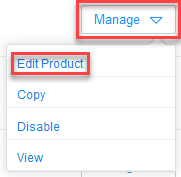
Clicking on the Manage button beside the product you want to configure, then selecting Edit Product.

The product properties will be shown in the main work area with a menu at the left to select property categories. General will be selected by default.
-
Select Views & Decoration Areas from the product properties menu.
The main work area contains configuration options for views and decoration areas.
-
Click the blue gear icon next to the view you want to place a custom decoration area on. Make sure the Allow Custom Decoration Areas (Advanced) option is selected.
-
Double-click on the view image to open the **Manage Product View** popup.
- Select the area you want to apply a custom shape to by clicking on its name in the decoration area table.
-
Click the Browse... button and upload your shape.
Once uploaded, the shape will appear as an icon alongside the existing printable area shapes.
For a complete tutorial on how to configure a decoration area, see the article, Configuring Product Views & Assigning Decoration Areas.
- Custom decoration areas may appear misaligned or shift when product images are updated, since the areas are positioned relative to the original product image. If you update the product image later, you will likely need to review and adjust the custom decoration area to maintain alignment.
- When viewed in the Designer, decoration areas are displayed with a visible outline:
- Rectangular and rounded rectangle areas show a solid border (with rounded corners for rounded rectangles).
-
Circle and ellipse shapes display a solid circular border.
Improvement implemented in V8.610. -
Custom shapes (based on uploaded masks) show a dotted outline around the decoration area’s boundary.
Improved feature implemented in V8.610.
Best-practice tips
- After uploading a custom shape mask, always preview the product in the Designer and verify the shape appears correctly on the intended printable area.
- If you change the product view image (for example, a new photo or angle), revisit the decoration area placement and adjust as needed.
- Keep your import PNG shape files with transparent backgrounds and a single uniform fill color (this ensures the mask reads correctly).
- For complex products with multiple printable zones, consider naming each decoration area clearly (e.g., “Front Star Shape”, “Left Sleeve Heart Shape”) to avoid confusion.
Troubleshooting
Issue: The decoration area appears mis-aligned in the Designer.
Solution: Update the product view image and then re-upload or reposition the custom decoration area mask so the alignment matches the new image.
Issue: The custom shape doesn’t appear when decorating.
Solution: Confirm the PNG file was saved with transparency and that the “Allow Custom Decoration Areas (Advanced)” box was selected. Also verify you uploaded the mask to the correct decoration area in the product view.
FAQs
- Which file format should I use for the custom shape mask? Always use PNG with transparency – other formats may not render properly.
- Can I use vector (SVG) shapes? No. At present only bitmap PNG files are supported for custom decoration shape masks.
Additional Resources
- Manage Decoration Areas
- Configuring Product Views & Assigning Decoration Areas
- Enable a Decoration Process on Decoration Areas in Bulk
Still have questions? Use the Search Tool at the top of the page to find more related guides. Need help? Click the icon to submit a support ticket—our Client Services team is ready to assist!
Comments
0 comments
Please sign in to leave a comment.