
Abandoned cart follow-up emails help you recover lost sales by reminding customers about the items they left behind. In DecoNetwork, you can configure an automated follow-up message to encourage customers to complete their purchase. This article explains how to set up and customize the abandoned cart email template.
In This Article
- Prerequisites
- Why configure abandoned cart emails?
- Step 1: Access the abandoned cart template
- Step 2: Configure general settings
- Step 3: Set automated sending options
- Step 4: Add a marketing message
- Step 5: Override the default template (optional)
- Step 6: Save and test
- Best-Practice Tips
- Troubleshooting
- FAQs
- Additional Resources
Prerequisites
Before you begin:
- You must have administrator access to DecoNetwork.
- Your store must have email sending configured (SMTP or DecoNetwork email service).
- Your checkout process must capture customer email addresses before purchase.
Why configure abandoned cart emails?
Every abandoned cart is a missed opportunity. By enabling follow-up emails, you can:
- Recover lost sales by nudging customers to complete their purchase.
- Increase customer engagement and retention.
- Provide a personalized experience using template variables.
- Save time through automation—no manual outreach required.
Step 1: Access the abandoned cart template
- Log into Admin
- Click Settings
- Click Email & Order Templates
- Click Email Templates
- Scroll down to the Customer Contact Emails section and click Edit beside "Abandoned cart follow-up email".
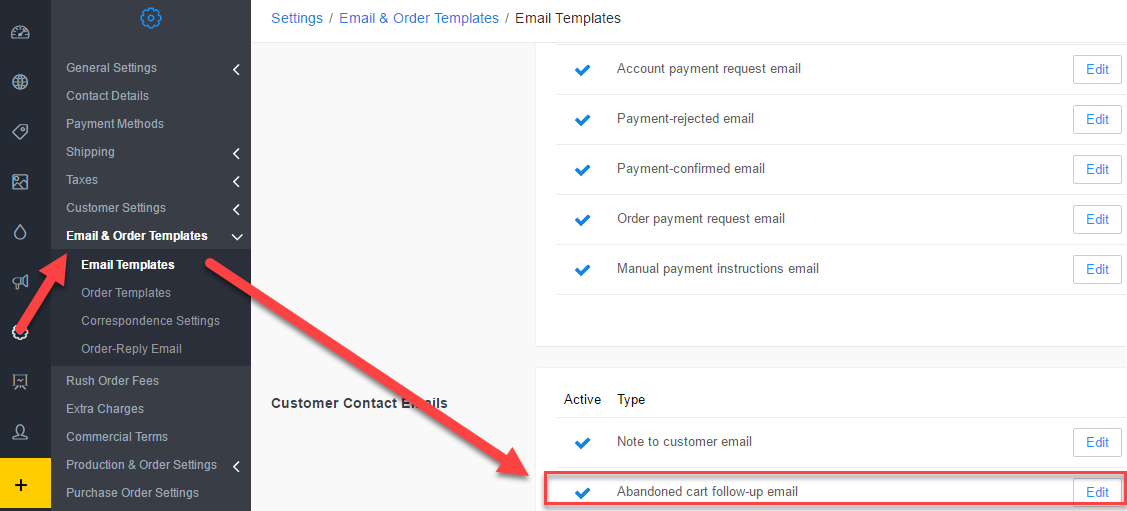
The Edit Email Template page is displayed.
Click the thumbnail to enlarge.
Example of the abandoned cart email template in Admin → Settings.
Step 2: Configure general settings
- Tick the Active checkbox to turn the Abandoned cart follow-up email on.
- Enter addresses for copy and blind copies.
-
cc lets you specify a list of email addresses that will receive carbon copies of abandoned cart emails.
These addresses are visible to the customer.
- bcc lets you specify the email addresses of additional abandoned cart email recipients, however, these email addresses are hidden from the customer.
-
cc lets you specify a list of email addresses that will receive carbon copies of abandoned cart emails.
Step 3: Set automated sending options
- Tick Automatically send emails to abandonded carts to toggle on the automated sending of emails, at a period defined by the Send after %s days box.
- Define how many days after abandonment the email will be sent (e.g., 1 day = 24 hours).
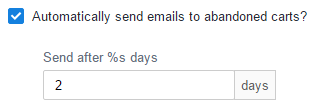
Tip: Start with 1 day after abandonment, then test different intervals to optimize conversion.
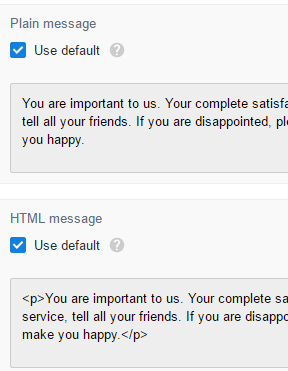
Step 4: Add a marketing message
You can include an optional Marketing Message in the email. This can be a simple promotional note, such as a discount or free shipping offer, encouraging the customer to return and complete their purchase.
By default, the text will appear as a footer to the abandoned cart email. The tag for its use in a template is {{ message_html }}.
- Tick/untick Use default to toggle the default message on/off. When set to off it may be edited and saved.
- Optionally customize the marketing message.
- Plain text is the message in plain text without markup formatting.
-
HTML message is a full HTML version of the message.
By default, the text in the subject, HTML body, and Text body make up the template that is sent during an abandoned cart email. Note that the variables {{ message_html }} and {{ message_plain }} are replaced by the text set in the Marketing Message menu item, and {{ custom_message }} is used when an abandoned cart email is sent to the customer via Business Hub.
Step 5: Override the default template (optional)
If you want to fully customize the abandoned cart email content:
- Check Override default template.
- Edit the Subject, HTML body, and Text body.
- Use the available template variables to personalize your message.
- {{site.name}} changes to the name of the business
- {{customer.full_name}} changes to your site owners' name
- {{ continue_order_url }} changes to the URL the customer may visit to continue shopping with their abanded cart
- {{ custom_message }} is used when an email message to the customer is sent via Business Hub. You have the option at the time of sending to customize the message with additional text, and if that text is used then it is inserted here. It is not able to be used unless the message is sent manually via Business Hub
- {{ site.primary_domain }} URL of your site
- {{ message_html }} HTML of the email you wish to send
- {{ message_plain }} Plain text version of the email you wish to send
Step 6: Save and test
- Click Save to apply your changes.
- Perform a test by creating an order, abandoning checkout, and verifying that the follow-up email is delivered.
Best-Practice Tips
- Send the first reminder within 24 hours of abandonment for best results.
- Keep the subject line short and personalized, e.g. “{{ customer.first_name }}, you left something behind!”
- Avoid over-messaging—one or two reminders is usually enough.
- Include a clear call-to-action (CTA) button linking to
{{ continue_order_url }}.
Troubleshooting
- No emails are sending: Confirm the template is Active and that Automatically send is enabled.
- Variables appear as {{ … }}: Check that you typed them exactly as listed.
- Emails go to spam: Verify your SPF/DKIM records and email domain settings.
- Duplicate reminders: Review your “Send after [x] days” setting to ensure it isn’t conflicting with other campaigns.
FAQs
- Can I add discount codes? Yes, simply include your coupon code text in the marketing message or HTML body.
- Can I preview the email? Yes, by overriding the template you can use the Preview option before saving.
- What happens if the customer checks out before the reminder is sent? The email will not be sent once the order is complete.
Additional Resources
Still have questions? Use the Search Tool at the top of the page to find more related guides. Need help? Click the icon to submit a support ticket—our Client Services team is ready to assist!
Comments
0 comments
Please sign in to leave a comment.