DecoNetwork users commonly offer custom-decorated products with a locked design that customers can buy as is or add personalization, such as a name. We often get asked how to add a personalization surcharge for such products in this scenario. You can do this using custom fields.
Watch the following video for instructions on how to add a personalization surcharge.
Prerequisites
- You must have administrator access to use this feature
To add a personalization surcharge using custom fields:
- Log into your DecoNetwork Website.
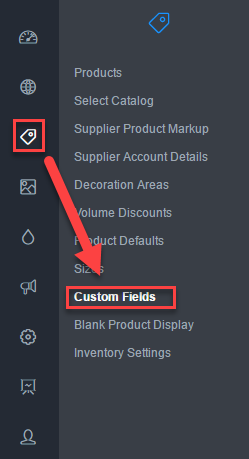
- Browse to Admin > Products.
- Select Custom Fields.


The Custom Fields main work area will show you a list of previously configured custom fields.

- Click on the
button at the top right of the work area.
The settings for the new custom field will be displayed.

- Configure the custom field's settings.
Field on by default

Ticking this checkbox will display this custom field as an option when the default behavior for the product is also to display custom fields. This corresponds to a product's custom field configuration to "Use System Fields" (found under Admin > Products > [product] > Custom Fields). Additionally, if the Product Groups app is enabled, the behavior of the product group is set at Admin > Products > Product Groups.

Required

Tick this checkbox to force the user to complete the custom field as the product enters the shopping cart.
Title
This is the name of the field. Enter a name for the field, e.g. Personalization
Description
Description lets you provide information that can be in the form of a question or a prompt that will help the customer complete the custom field.
Type
Type defines which sort of on-screen input method the customer will use to enter data. For this option, we will use the Select, Drop-down type.

Drop-down is a list that opens up when the user clicks on the field. When this option is selected, you will be able to define the options for the dropdown list. The options will appear in a table below the Type field.
Click on the
button to add an option. A row will be added to the table containing the following settings:
- On means the option will be used.
- Default is the option selected on page load.
- Name is the text that will appear in the option.
- Code is the text saved from selecting the option.
Configure a 'Yes' and a 'No' option as follows.
The blue configuration wheel at the right of the Options table contains extra settings for the Select field type, including the ability to modify price and allow size variants:
- [Title] affects price opens the price modifier options
- Allow size variants will let you add size variants to each option.
Click on the cog icon and tick the Personalization affects price checkbox. Price settings will be shown.
- Price depends on color lets price be modified based on the color of the product being sold. Options here are to modify by a flat fee or as a percentage of either the base price, the decoration price, or both.
- Affect by lets you choose whether the price is specified by an exact value or as a percentage.
An additional price column will be displayed in the options table.
Enter the price or percentage for the 'Yes' option.
- Click Save.
- Click on the
button to add another option.
- Configure the custom field's settings.
Required

Tick this checkbox to force the user to complete the custom field as the product enters the shopping cart.
Title
This is the name of the field. Enter a name for the field, e.g. Your Name
Description
Description lets you provide information that can be in the form of a question or a prompt that will help the customer complete the custom field.
Type
Type defines which sort of on-screen input method the customer will use to enter data. For this option, we will use the Text, Text Field type.

Length
Length lets you specify the visual length of the field. You can leave the value as the default.
Maximum Characters
Maximum Characters lets you set the maximum number of characters you want to allow the customer to enter.
- Click Save.
- Assign the custom field to blank products that this decoration option can be applied to. See the article Using Custom Fields in Products for instructions.
Comments
0 comments
Please sign in to leave a comment.