
Product groups let you set default configuration for a whole collection of similar products at once, instead of setting up pricing, sizing, decoration areas, shipping, and other properties on every product individually. This layer of settings sits between your global settings, which apply to your entire product list, and individual product settings, which only affect a single product. Because the system retains whatever you configure at the product group level, those defaults keep applying to every product assigned to the group and carry through into pricing, availability, and production as orders are placed.
In This Article
- Prerequisites
- Why use this feature?
- Step 1: Open the Product Groups list
- Step 2: Configure General settings for a product group
- Step 3: Configure Decoration Processes, Pricing, and Taxes
- Step 4: Configure Minimum Quantities and Bundles, and Sizing
- Step 5: Configure Shipping, Production, and Purchasing
- Step 6: Configure Availability and Custom Fields
- Step 7: Assign a product group to a product
- Best Practices
- Troubleshooting
- FAQs
- Additional Resources
Prerequisites
- You must have Admin access to use this feature.
- The Product Groups app must be enabled under Apps Store → Product Extensions.
- If you plan to set Availability rules by store group, the store groups you want to use should already be created, with stores assigned to them.
Why use this feature?
Product group settings determine the default pricing, sizing, decoration, shipping, production, purchasing, and availability behavior for every product assigned to that group. Because the system retains these settings with the group, updating them updates every product in the group at once, and any setting left at product level automatically defers to the group's default. Product-level settings still take priority when a specific product needs to behave differently.
- Configure pricing, sizing, decoration areas, and shipping for many similar products in one place instead of product by product
- Keep related products consistent as your catalog grows, since new products just need to be assigned to the right group
- Reduce manual maintenance when a shared setting changes, such as a markup percentage or a production timeframe
- Still allow exceptions, since any setting you configure directly on a product overrides the group's default
Step 1: Open the Product Groups list
-
Admin → Products.
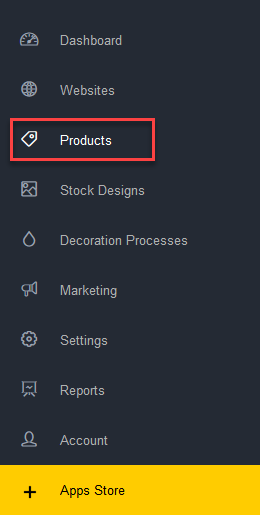
The Products option in the Admin navigation menu.
-
Select Product Groups.
The Product Groups option under the Products menu.
The Product Groups page opens, listing your existing groups along with the decoration processes each one applies. From here you can edit a group, delete a group you added, reorder groups using the arrow buttons, or click New Product Group to create one.
The Product Groups list, showing existing groups and their decoration processes.
Step 2: Configure General settings for a product group
-
Click Edit beside an existing group, or New Product Group to create one.
The product group's settings open, with General selected by default.
The General settings for a product group.
- Use Active to enable or disable the group.
- Enter a Name for the group.
-
Optionally choose a Default category for new products assigned to this group.
This sets the starting category for new custom products created in this group, as shown in the product selector and on your webstore. Click Clear to remove a selected category. A product group can be saved without a category assigned.
Products from an inactive group, highlighted in the Admin Product List.
Step 3: Configure Decoration Processes, Pricing, and Taxes
-
Select Decoration Processes from the product group's settings menu to configure decoration pricing and process mixing rules.
If you're on a Premium or Enterprise plan, you'll see a Contract Price Level option here. Contract price levels are different selling price tiers you can offer to specific stores or customers, created under Admin → Products → Contract Price Levels. Select a level by radio button to configure decoration pricing for that tier, then assign the level to a store or customer. A price level assigned directly to a customer overrides one assigned to their store, which overrides the product group's own pricing. See Contract Price Levels and Store Contract Price Level.-
For each decoration process, choose Use System Decoration Pricing to apply the pricing configured under Admin → Products → Decoration Processes → Decoration Pricing, or Specify Custom Decoration Pricing to set pricing for this group only.
Choosing custom pricing enables fields to mark the process Active, choose a Pricing Method, and enter Decoration Prices. Untick Use System Decoration Prices to edit these fields.
-
Under Select Mixable Processes, tick the decoration processes that can be combined with each other within a single decoration area.
The Decoration Processes settings for a product group.
-
-
Select Pricing to set the markup applied to supplier costs, which establishes the blank product's selling price.
The Pricing settings for a product group, showing markup and volume discount options.
-
Choose Use System Markup to apply the markup configured under Admin → Products → Supplier Product Markup, or Specify Custom Markup to set markup for this group only.
Custom markup can be a Fixed Markup, a flat percentage applied regardless of cost, or a Tiered Markup, where you set a Price From value and a markup percentage for each cost range. Click Add Markup Tier to add a range, or Delete to remove one.
The Catalog Markup Pricing settings with Tiered Markup configured.
- Under Volume Discount, select a pre-configured discount from Admin → Products → Volume Discounts if you want one applied to this group.
-
-
Select Taxes to configure how products in this group are taxed. Tax settings configured here are retained with the group and applied automatically whenever these products are ordered.
The Tax Settings for the Product Group.
Step 4: Configure Minimum Quantities and Bundles, and Sizing
-
Select Minimum Quantities and Bundles to set purchase minimums and bundle options for the group.
The Minimum Quantities and Bundles settings for a product group.
- Enter a Minimum Quantity for the smallest amount a customer can purchase.
-
Tick Use Bundles to sell in set bundle sizes rather than individual units.
Choose Use incremental bundles to build bundle sizes from a fixed increment above the minimum quantity, or Specify custom bundles to enter exact sizes (for example, 1, 5, 20, 50, 100). Click Add Bundle Size to add a size, or Remove to delete one.
Custom bundles sizes for a product group.
- Select Sizing to control which sizes are available for products in this group. By default, the group uses whichever sizes are switched ON under Admin → Products → Sizes.
-
Click the cog icon and tick Use Custom Configuration to set sizes specifically for this group.
The Size Table becomes editable, where you can define the sizes this group uses.
The Sizing settings for a product group.
Only custom products assigned to use a product group take their sizing from that group. Catalog products always use the sizes set by the supplier, regardless of this setting.
-
Step 5: Configure Shipping, Production, and Purchasing
- Select Shipping Dimensions & Weights to set default package details for products in this group.
-
Choose a Shipping Price Level from the dropdown, if you use price levels created under Admin → Settings → Shipping → Shipping Price Levels.
The Shipping price level setting for a product group.
-
Enter default Length, Width, Height, and Weight values for the packed product.
A value of zero in any of these fields is ignored, so the field simply won't apply a default.The Shipping Dimensions & Weights settings for a product group.
-
- Select Production to set default production timeframes and available statuses per decoration process. These settings determine how production time is calculated and which statuses appear as an order moves through fulfillment.
-
Choose Use Default Production Times to apply the timeframes configured under Admin → Settings → Production & Order Settings, or Specify Custom Production Times to set the number of days required per decoration process for this group. You can also set a default production time for blank products sold without decoration.
The Production settings for a product group.
-
Choose Specify Custom Production Statuses to switch individual statuses on or off for this group, instead of making every system status available.
Production statuses available to a product group.
-
- Select Purchasing to set purchase order workflow and inventory behavior for the group.
-
Set the Purchase Order Workflow option to control how purchasing behaves for products in this group. This field is required and defaults to Use default.
The Purchasing Workflow setting for a product group.
-
Under Inventory, customize the inventory settings for this product group to override the global out-of-stock behavior set in Admin → Products → Inventory Settings.
The Inventory On-hand Behavior settings for a product group.
- Use Default Inventory Settings applies the standard out-of-stock behavior already configured globally in Admin → Products → Inventory Settings.
-
Specify Custom Inventory Settings overrides the global out-of-stock behavior for this group. Choose one of the following from the Out of stock behavior dropdown:
- Allow adding to cart: lets customers add out-of-stock products to their cart.
- Do not allow adding to cart (check on-hand inventory): stops customers from adding out-of-stock products to their cart.
- Do not allow adding to cart (check supplier inventory): prevents customers from adding products that are out of stock in supplier inventory.
-
Do not allow adding to cart (check both on-hand and supplier inventory): prevents customers from adding products that are out of stock in both on-hand and supplier inventory.
The on-hand inventory options only apply to products with on-hand inventory tracking enabled. See How to enable on-hand inventory for a product.Catalog products with on-hand inventory tracking enabled check both levels: on-hand inventory is checked first, and if that's out of stock, the system then checks supplier inventory. The supplier inventory check only applies to DecoNetwork catalog products from suppliers with live ordering enabled. Custom products with inventory tracking enabled only check on-hand inventory levels.
If a product is completely out of stock, across every SKU, at both the on-hand and supplier level, the system hides it from your blank product and decorated product lists. You can view supplier inventory amounts on the blank product's SKU, GTIN & Inventory page, and on the Inventory On Hand page in Business Hub.
- When checking supplier inventory, enter a Supplier out of stock threshold to set the minimum supplier stock level customers can order down to. If the supplier inventory level is at or below the amount you enter, customers won't be able to add the product to cart under supplier inventory settings.
-
Step 6: Configure Availability and Custom Fields
-
Select Availability to control which sales channels and stores can order products in this group. These settings work the same way as availability settings at the individual product level, and any setting made directly on a product still overrides the group's default.
This is the same Availability configuration used at the individual product level. See Configure product availability at the product group level for a full walkthrough with screenshots of each screen.- Under Business Hub and Webstore Availability, choose whether products in this group can be ordered through Business Hub, through web stores, or both. Choosing a web store option makes products available to all web stores.
- Under Global options, set the group's default availability across your stores.
- Under Group settings, click Add Rule to allow or deny availability for a whole store group at once. Search for the group by name, select it, then set it to allow or deny.
- Under Store rules, click Add Rule to allow or deny availability for individual stores. Search for and select the stores you want, then set each one to allow or deny.
If a product in this group isn't showing on a store, the Visibility Checker on that product's edit page will tell you directly whether a group-level setting is the cause. - Select Custom Fields to define extra data fields that are collected whenever a product from this group is ordered on your website, such as a personalization note or a required approval field.
Step 7: Assign a product group to a product
- Admin → Products.
-
Select the product you want by clicking its product code or product name, or by clicking Manage beside the product and selecting Edit Product.
The product's properties open, with General selected by default.
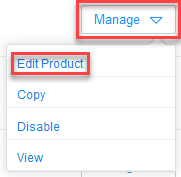
The Edit Product option under a product's Manage button.
-
Click change beside Product Group.
The change link beside Product Group on a product's General page.
-
Select the group you want from the Product Group dropdown.
Selecting a product group from the dropdown.
-
Click Save.
The product is now assigned to the group and picks up its default pricing, sizing, decoration, shipping, production, purchasing, and availability settings. Any setting you've already configured directly on the product is retained and continues to override the group's default.
Best Practices
- Build product groups around how you actually price, ship, and decorate similar products, so most products can just inherit the group's defaults instead of needing individual overrides.
- Start with Use System Decoration Pricing and Use System Markup, and only switch to custom pricing for the specific groups or contract price levels that truly need to differ.
- Organize your store groups before setting Availability rules at the group level, so franchise, wholesale, or regional stores can be managed together.
- Review the products assigned to an inactive group periodically. They still exist and still display, just with an inactive highlight, so they're easy to overlook.
- Use the Visibility Checker after changing Availability settings to confirm the result for the stores that matter most.
Troubleshooting
Problem: A product isn't using the pricing, sizing, or shipping details set on its product group.
Cause: A setting configured directly on the product overrides the group's default.
Solution: Open the product and check whether that setting has been configured at the product level. Clear the product-level setting if you want it to follow the group instead.
Problem: A decoration process isn't available for products in a group.
Cause: The process isn't marked Active for the current contract price level, or hasn't been added under Select Mixable Processes if it needs to combine with another process.
Solution: Open Decoration Processes for the group, confirm the correct contract price level is selected, and check the Active setting for that process.
Problem: Custom bundle sizes aren't appearing on the store.
Cause: Use Bundles hasn't been ticked, or no bundle sizes have been added yet.
Solution: Open Minimum Quantities and Bundles for the group, tick Use Bundles, and add the bundle sizes you want.
Problem: A product from the group isn't showing on a specific web store even though Availability looks correct at the group level.
Cause: A product-level Availability override exists, or a Store or Group rule is denying access for that store.
Solution: Use the Visibility Checker on the product's own Availability page for that store, then check both the product-level and group-level Availability rules.
FAQs
What's the difference between global settings, product group settings, and product-level settings?
Global settings apply to your entire catalog by default. Product group settings override the global default for every product assigned to that group. Product-level settings override the group's default for that one product. The system checks product level first, then the group, then falls back to global.
Can I use product groups for free form products?
Yes. Free form products, meaning products defined directly in Business Hub without being saved to your system products list, can be assigned to a product group. The available settings are a subset of those available for system products.
What happens to products already assigned to a group when I change the group's settings?
Any product using the group's default for that setting picks up the change automatically. Products with a product-level override for that setting are unaffected.
Can a product belong to more than one product group at a time?
No. A product is assigned to a single product group at a time, selected from the Product Group dropdown on the product's General page.
Additional Resources
Still have questions? Use the Search Tool at the top of the page to find more related guides. Need help? Click the icon to submit a support ticket – our Client Services team is ready to assist!
Comments
0 comments
Please sign in to leave a comment.